 | Web Design in a Nutshell, 2nd Edition |  |

There are a number of reasons why you may want to slice a large image into pieces and use a table to reconstruct it seamlessly on a web page:
If you want portions of the image -- but not the whole image -- to respond to the mouse passing over them (mouseover events or rollovers), it is more efficient to swap out just the bits that change instead of replacing the whole image. Rollover effects are created with JavaScript. See Chapter 28, "Introduction to JavaScript" for sample code.
Similarly, if you want to add animation to small areas within an image, it is better to break up the image and animate just the portions that move. This will result in smaller files to download.
At times, you may find that an image contains distinct areas of flat color and distinct areas of soft or photographic images. Breaking the image into sections allows you to save some sections as GIF (the flat color areas) and others as JPEG (for graduated tones), to achieve better optimization and image quality overall. For more information on optimizing images, see Chapter 19, "GIF Format" and Chapter 20, "JPEG Format".
Break the image into separated linked images instead of using an imagemap. This allows alternative text (using the alt attribute) to be added for each linked section of the image (instead of a single alt message for the whole imagemap). This makes the page more accessible for people using non-graphical or speech-based browsers.
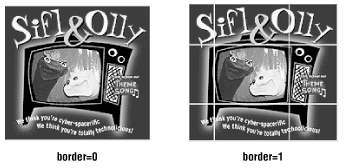
In Figure 13-26, I've divided an image into sections so I can save the television image as a JPEG and the rest as GIFs (since they are flat, graphical images). It also allows me to swap out the television image based on rollovers elsewhere on the page. The table on the right has its border set to 1 to reveal the individual graphics that make up the image. When the border is set to zero, the effect is seamless, as shown on the left.
Multipart images in tables have been growing in popularity in recent years. Not surprisingly, software companies have responded with tools that make the production process much easier than the previously discussed method of splitting the graphic manually and writing the table code in an HTML editor. (This manual method is outlined a little later.)
Macromedia Fireworks, Adobe Photoshop 6.0, and Adobe ImageReady (all available for both Windows and Mac) include functions that slice up an image, export the individually numbered graphics (based on the position of guidelines), and automatically write the table code that holds them all together.
You can then just copy and paste the table code into your HTML file. One caution: you will need to adjust the pathnames if your graphics are to reside in a different directory from your HTML files. The automatically generated code writes relative pathnames assuming everything will be in the same directory. A simple find-and-replace in your HTML file should take care of this quickly.
Fireworks makes its slicing tool available in the Toolbox. These are the basic steps for creating a sliced image and its accompanying HTML file:
Create or open your image. Using the Slice tool from the Toolbox palette, define rectangular segments of the image. Note that if you place a rectangular slice in the middle of a graphic, Fireworks automatically slices the remainder of the image into the fewest number of segments to contain the specified slice.
To set the default export settings (file format, bit depth, color palette, dithering, etc.) for the entire image, you must be sure that no slicing objects are selected, then adjust the settings in the Optimize palette. These settings will be applied to all slices after exporting.
You can override the default export settings for an individual slice -- for instance, to reduce its palette, or to make it a different file format. Select the slice object, then adjust its properties in the Optimize palette (the word "slice" appears in the top bar when a slice is selected).
Once you have your slices chosen and configured, export the file by
selecting File  Export. In the Export dialog box, select
"Use Slice Objects" from the Slicing pop-up menu and set
a base name for the graphics (Fireworks names them automatically
based on the name you provide). You can also set a target directory
for the files.
Export. In the Export dialog box, select
"Use Slice Objects" from the Slicing pop-up menu and set
a base name for the graphics (Fireworks names them automatically
based on the name you provide). You can also set a target directory
for the files.
When you click Export, Fireworks creates all the graphic files and the HTML file for the sliced image. You can now copy the table code from the generated HTML file and paste it into your final document (be sure that the pathnames are correct).
For more information about Fireworks, see http://www.macromedia.com/software/fireworks.
ImageReady is a tool for advanced web graphics production that comes bundled with Photoshop Versions 5.5 and higher. The process for creating a sliced image in ImageReady is nearly the same as the one described for Fireworks.
Open the source image. Select Slices Show Slices to make the
Slices layer visible. You may also want to use guidelines to help
control your selections. Use the Slice tool (it looks like a little
knife) to outline the important elements in your design. When a slice
is selected, its image appears in the Slice palette.
With the Slices layer turned off, you can use the Optimize palette to make export settings (file format, number of colors, etc.) for the entire image. You can override these settings for a particular slice by selecting it with the Slice Selection tool, then making adjustments in the Optimize palette.
When you are ready, save the file using File Save Optimized.
This gives you a dialog box where you can choose to have ImageReady
save the images and the HTML file. Click the Options buttons next to
each selection to access other relative options. For an explanation
of these options, see the ImageReady manual. When you are ready,
click Save.
Photoshop 6 is the first Photoshop release to feature slicing functions (slicing was delegated to ImageReady in previous versions). As with ImageReady, you can create slices using a special slicing tool from the toolbar. Adobe calls slices created with the slicing tool "user-slices." Photoshop will also generate slices based on pixel information in a layer (called "layer-slices").
This is particularly useful for making rollover buttons. Place the rollover element on a separate layer and create a slice from that layer (select "New Layer Based Slice" from the Layer menu). If you apply an effect to the layer that changes the pixel dimensions (such as a glow or a drop shadow), the layer-slice automatically resizes to encompass the new pixels.
If you don't have Fireworks or the latest version of Photoshop, it's certainly possible to create the effect by hand. First, divide the image into separate graphic files using an image processor such as Paint Shop Pro or Photoshop 4 (used in the following example). Photoshop 5.5 and higher comes with a copy of ImageReady that does the work for you. Then write the HTML for the table using whichever HTML editor you like. These methods are demonstrated in the following sections.
When dividing an image with Photoshop, it is important to set the guide preferences in a way that enables easy and accurate selections without redundant or overlapping pixels between image sections. This is described in steps 2 and 3.
Open the image in Photoshop. Make sure the rulers are visible by
selecting View Show Rulers.
Set your preferences to use pixels as the unit of measurement by
selecting File Preferences Units & Rulers. Select
"pixels" from the pop-up menu and hit OK.
Select View Snap to Guides. This will snap your selection to
the precise location of the guide.
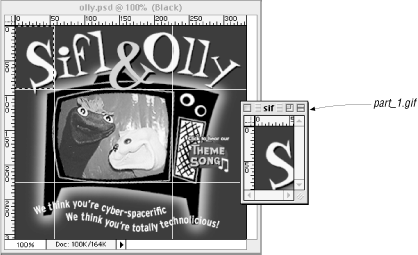
Use the rectangle marquee (make sure feathering and anti-aliasing
options are turned off) to select each area of the image (Figure 13-27). You can use the Info palette (Window
Show Info) to get accurate pixel measurements for each section as you
select it. You'll need this information when you create the
HTML file.
Copy and paste each section into a new file (Figure 13-27). Flatten the image and save it as a GIF or JPEG. You may want to develop a numbered naming scheme to keep the pieces organized.
Following is the HTML code that is used to hold together the image from Figures Figure 13-26 and Figure 13-27:
<TABLE BORDER="0" CELLPADDING="0" CELLSPACING="0" WIDTH="333">
  <TR>
  <TD><IMG SRC="part_1.gif" WIDTH="56" HEIGHT="92" BORDER="0"></TD>
  <TD><IMG SRC="part_2.gif" WIDTH="169" HEIGHT="92" BORDER="0"></TD>
  <TD><IMG SRC="part_3.gif" WIDTH="108" HEIGHT="92" BORDER="0"></TD>
  </TR>
  <TR>
  <TD><IMG SRC="part_4.gif" WIDTH="56" HEIGHT="133" BORDER="0"></TD>
  <TD><IMG SRC="part_5.gif" WIDTH="169" HEIGHT="133" BORDER="0"></TD>
  <TD><IMG SRC="part_6.gif" WIDTH="108" HEIGHT="133" BORDER="0"></TD>
  </TR>
  <TR>
  <TD><IMG SRC="part_7.gif" WIDTH="56" HEIGHT="82" BORDER="0"></TD>
  <TD><IMG SRC="part_8.gif" WIDTH="169" HEIGHT="82" BORDER="0"></TD>
  <TD><IMG SRC="part_9.gif" WIDTH="108" HEIGHT="82" BORDER="0"></TD>
  </TR>
</TABLE>
There is no difference between writing a table for piecing together graphics and writing any other kind of table; however, pay careful attention to the following settings if you want the image to piece back together seamlessly on all browsers:
In the <table> tag, set the following attributes to zero: border=0, cellpadding=0, cellspacing=0.
In the <table> tag, specify the width of the table with an absolute pixel value. Be sure that the value is exactly the total of the widths of the component images. You may also add the height attribute for thoroughness' sake, but it is not required.
Don't put extra spaces or line returns between the <td> and the <img> tags (extra space within <td>s causes extra space to appear when the image is rendered). Keep them flush together on one line. If you must break the line, break it somewhere within the <img> tag.
Set the width and height values in pixels for every image. Be sure that the measurements are accurate.
Set border=0 for every image.
Specify the width and height pixel values for every cell in the table, particularly if it contains colspans and rowspans. Be sure that they match the pixel values set in the <img> tag and the actual pixel dimensions of the graphic. For simple grid-like tables (such as the one in Figure 13-26), you may not need to give individual cell dimensions because the enclosed images will force each cell to the proper dimensions.
If your table has a lot of column spans, be sure there is at least one row with all its cells intact so you can declare the width of every column in the table. If there are no intact rows, add a dummy row (as described in Section 13.5.7, "Column Span Problems" earlier in this chapter) to ensure the image segments line up correctly.
Sometimes it is preferable to keep the table simple. For instance, the sample graphic could have been divided into just five portions (a top graphic, three middle graphics, and a bottom graphic) and held together with a table made up of three rows with a single cell each. These decisions are a matter of judgment and obviously depend on the individual project.
|  | |
| 13.7. Standard Table Templates |  | 14. Frames |

Copyright © 2002 O'Reilly & Associates. All rights reserved.