 | Web Design in a Nutshell, 2nd Edition |  |

The GIF89a format introduced the ability to make portions of graphics transparent. Whatever is behind the transparent area (most likely the background color or pattern of the page) will show through. With transparency, graphics can be shapes other than rectangles (Figure 19-3)!

In most graphics tools, the transparent area is specified by selecting a specific pixel color in the image with a special transparency pointer or eyedropper tool (in Paint Shop Pro, it needs to be specified numerically). All pixels in the image that match the selected color will be transparent when they are rendered in a browser.
To understand how transparency works, you need to start with the color table (the table that contains the palette) for the indexed color image. In transparent GIFs, one position in the color table is designated as "transparent," and whatever pixel color fills that position is known as the Transparency Index Color (usually gray by default). All pixels in the image that are painted with that color will be transparent when viewed in a browser.
Let's look at techniques for working with transparent GIFs. These techniques use Adobe Photoshop for its layering features. The first provides strategies for getting rid of "halos" (or fringe) around transparent graphics. The next gives pointers for preventing unwanted transparency within your image.
Far too often, you see transparent graphics on the Web with light-colored fringe around the edges (called a "halo") that doesn't blend into the background color (see Figure 19-4).

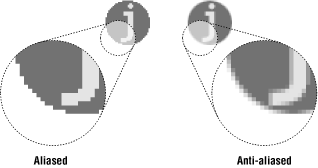
This effect is the result of anti-aliasing, the slight blur used on curved edges to make smoother transitions between colors (like the image on the right in Figure 19-5). Aliased edges, by contrast, are blocky and stair-stepped (like the image on the left). The images below have been enlarged to make pixel-level detail more prominent.
When the color around an anti-aliased edge is made transparent, the blur along the edge remains intact, and you can see all those shades of gray between the graphic and the darker background. Halos make graphics look messy and unprofessional.
Unfortunately, once an image is saved as a GIF, the only way to fix a halo is to get in there and erase the anti-aliased edge, pixel by pixel. Even if you get rid of all the edges, you'll be left with blocky edges and the quality of the image will suffer.
However, halos are very easy to prevent. Following are a few techniques to avoid that unwanted fringe in transparent graphics.
One way to avoid halos is to keep your image and text edges aliased (as shown in Figure 19-6). That way there are no stray pixels between your image and the background color.

In Photoshop, the marquee, lasso, and magic wand selection tools all have the option of turning off anti-aliasing in their respective Option palettes. You can also choose to turn off anti-aliasing when creating text.
The advantages to aliased edges are that they are halo-proof and require fewer pixel colors (which potentially means smaller file sizes). The disadvantage is that the blocky edges often just look bad.
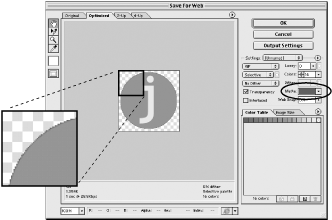
If you are using Fireworks, ImageReady, or Photoshop (5.5 and higher), the best way to prevent a halo is to use the Matte color tool. The tool requires that you start with a layered file that already contains transparent areas. In other words, the image must not have already been "flattened." The parts of the layered image that are transparent will remain transparent when exported to GIF format.
In the tool's optimization palette, simply set the Matte color to the same color as the background of the page on which the GIF will appear (Figure 19-7). When the GIF is exported with Transparency selected, the anti-aliased edges of the image blend with the selected Matte color. That blend ensures there will be no halo.
If you are working with Paint Shop Pro or an earlier version of Photoshop, there is an easy technique for avoiding halos, but it also requires that you begin with a layered file. If you are starting with a flattened image, such as from a CD-ROM or scan, you first need to use a selection tool to cut the image from the background (using an anti-aliased selection tool) and paste it on a layer of a new file.
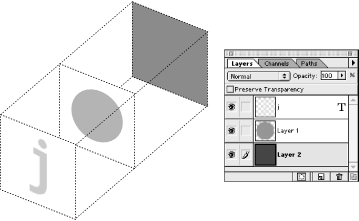
In your layered file, create a new layer at the bottom of the layer "stack."
Fill the whole layer with a color that is the same as, or as close as possible to, the background color of your web page (Figure 19-8). If you are using a tiled background pattern, choose a color that approximates its dominant color value. If you cannot select the exact color, it is better to guess a little darker.
When the layers are flattened as a result of converting to Indexed Color, the anti-aliased text and other soft edges will blend into the color of the bottom layer. The transition pixels will be the appropriate color, and they won't stand out when placed against the background color on your web page.
Select the background color to be transparent (using the transparency tool or specifying its RGB values) upon export.
In some instances, you'll find that the color around the edge of your image also appears within the image. This means that if you use an eyedropper tool to select the edge color for transparency, parts of your image will disappear as well.
The easiest way to prevent this is the handy Matte color feature of a web graphics application (discussed earlier), because it does not rely on an eyedropper tool for transparency. Rather, the transparent areas of the layered file are preserved upon export, and the solid pixels in the image area are unaffected.
However, if you are using a tool that does not have a Matte color feature, such as an early version of Photoshop or PaintShop Pro, there is a trick for preventing unwanted transparency. For this example, consider an image that has a white background, but also white text within the image area. The goal is to turn the white pixels around the image transparent, but to keep the white text white.
Follow these steps to create a distinct color for transparency:
Flatten your image so any anti-aliased edges will merge with your chosen background color (see Section 19.7.1.3, "Use a colored background layer", earlier in this chapter). If you are starting with an Indexed Color image, change it to RGB so you can add a color to its palette.
Using the Magic Wand tool with the tolerance set to 1 and anti-aliasing turned off (these settings are important!), select the areas in the image that you'd like to be transparent. Holding down the Shift key allows you to add to your selection. (Don't use "Select Similar" or you will select all the pixels in the image, which is what you're trying not to do!)
Using the Fill tool (or doing it by hand), fill your selection with a distinct color that does not appear anywhere in the image (one of the obnoxious bright colors usually works well).
Check the image to be sure that all areas you wish to be transparent are filled with the obnoxious color (and, of course, that no pixels in your image have changed).
Now you can convert the image to Indexed Color, save as GIF format, and select the distinct color to be transparent as you would normally.
The following is an optional addition to the preceding technique. If for some reason you are unhappy with the new color in your file, or if you worry that it will be visible if transparency isn't supported (not likely these days), you can turn the new color back to its original color value (white in our example) while keeping it distinct from nontransparent pixels sharing that color (the white in the text areas).
Create a distinct color for the transparency (as described previously).
After the image has been converted to Indexed Color, open the Color
Table (Image  Mode Color Table).
Find the new, distinct color in the Color Table (if you made it obnoxious enough, it should be easy to find), and click on it.
Edit the RGB values in the dialog box to set the color back to the color it was before (white in our example). By doing this, you are assigning a color (white) to two positions in the Color Table; one will be made transparent, and the other will remain visible.
For some transparent-GIF creation tools, it is important to know the position of the new white in the Color Table, so you may want to pay attention to the neighboring colors in the table.
Once the color is changed, close the dialog boxes and Export to GIF89a, selecting the background area to be transparent. You'll know you've selected the correct white because the areas will be filled with the Transparency Index Color in the preview.
|  | |
| 19.6. Interlacing |  | 19.8. Minimizing GIF File Sizes |

Copyright © 2002 O'Reilly & Associates. All rights reserved.