 | Web Design in a Nutshell, 2nd Edition |  |

Now that you have a basic understanding of the Document Object Model and know how to create layers, we can look at some useful examples to get you started on your own DHTML sites.
We already examined this script back in Example 29-1. When the user rolls the mouse over a link, the style of the text is changed to be red and underlined. This is done by manipulating the style property of links via the DOM. As we discussed earlier, the style property gives access to all of the CSS properties for an element. Using JavaScript, we can change the values of the color and textDecoration CSS properties when particular events occur. In this case, we use the onMouseOver and onMouseOut events. Here's the script again, to refresh your memory:
<html>
<head>
<title>Rollover Style Changes</title>

<style>
<!--
a { text-decoration: none; }
-->
</style>

<script>
<!--
function turnOn(currentLink) {
    currentLink.style.color = "#990000";
    currentLink.style.textDecoration = "underline";
}

function turnOff(currentLink) {
    currentLink.style.color = "#0000FF";
    currentLink.style.textDecoration = "none";
}
//-->
</script>
</head>

<body bgcolor="#FFFFFF">
<a href="#home"
   onMouseOver="turnOn(this);" onMouseOut="turnOff(this);">Home</a>
<a href="#contact"
   onMouseOver="turnOn(this);" onMouseOut="turnOff(this);">Contact</a>
<a href="#links"
   onMouseOver="turnOn(this);" onMouseOut="turnOff(this);">Links</a>
</body>
</html>
You can adapt this script for your own site by changing the color and textDecoration values, shown in bold. You can also modify the turnOn( ) and turnOff( ) functions to set additional properties the same way. For example, you can set the background of the links to a light yellow color when rolled over, simply by adding this line to turnOn( ):
currentLink.style.backgroundColor = "#FFFFCC";
And here's the corresponding line for turnOff( ), to reset the background color when the mouse exits the link:
currentLink.style.backgroundColor = "#FFFFFF";
Note that when you set style properties using JavaScript, as in this example, you must set them to strings.
There's actually one more thing you need to understand about this example: how the turnOn( ) and turnOff( ) functions know which link to modify. In each <a> tag, you'll notice that the link passes this as a parameter to the turnOn( ) and turnOff( ) functions. In JavaScript, the word this plays a special role, allowing an object (or element) to refer to itself. Our example passes this to turnOn( ) and turnOff( ) as a simple way of referencing the object for the current link, so that the function operates on the correct one. Using this is really just a shortcut; we also could have accessed the correct link using one of the DOM methods described earlier.
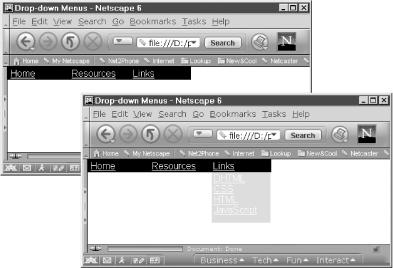
One of the most common interface elements in desktop applications is the menubar with drop-down menus. You can make the same kind of menus with DHTML by showing and hiding positioned layers, as shown in Figure 29-2. When the user clicks on "Resources" or "Links", a layer with links is displayed below it, just like a normal menu. When the user double-clicks on the link, the layer is hidden again.

The DHTML code in Example 29-3 creates the menus shown in Figure 29-2. The JavaScript combines two concepts we've seen before: creating a positioned layer and manipulating a style via the DOM.
<html>
<head>
<title>Drop-down Menus</title>

<script language="JavaScript">
<!--
function showLayer(layerid) {
    layer = document.getElementById(layerid);   (A)
    layer.style.visibility = "visible";   (B)
}

function hideLayer(layerid) {   (C)
    layer = document.getElementById(layerid);
    layer.style.visibility = "hidden";
}
//-->
</script>

<style type="text/css">
<!--
a { font-family: Arial, Helvetica, sans-serif;
    color: #FFFFFF; margin-left: 3px}
-->
</style>
</head>

<body bgcolor="#FFFFFF" text="#000000" topmargin="0" leftmargin="0"
      marginwidth="0" marginheight="0">
<table border="0" bgcolor="#000000" cellspacing="0" cellpadding="2">
  <tr>
    <td width="100"> <a href="#">Home</a></td>

    <td width="100">
      <div id="ResMenu"   (D)
           style="position:absolute; left:110px; top:23px;
                  width:100px; height:62px; z-index:1;
                  background-color:#CCCCCC; layer-background-color:#CCCCCC;
                  visibility:hidden">
        <a href="#">Scripts</a><br>
        <a href="#">Reference</a><br>
        <a href="#">Weblog</a>
      </div>

      <a href="#" onClick="showLayer('ResMenu');"   (E)
         onDblClick="hideLayer('ResMenu');">Resources</a>
    </td>

    <td width="100">
      <div id="LinksMenu"
           style="position:absolute; left:211px; top:23px;
                  width:100px; height:85px; z-index:2;
                  background-color:#CCCCCC; layer-background-color:#CCCCCC;
                  visibility:hidden">
        <a href="#">DHTML</a><br>
        <a href="#">CSS</a><br>
        <a href="#">HTML</a><br>
        <a href="#">JavaScript</a>
      </div>

      <a href="#" onClick="showLayer('LinksMenu');"
         onDblClick="hideLayer('LinksMenu);">Links</a>
    </td>
  </tr>
</table>
</body>
</html>The showLayer( ) function references the layer object for our menu with a document method, document.getElementById( ), and sets a variable named layer to be able to refer to that object again. The ID for the correct layer object is passed into the function as an argument, layerid. The showLayer( ) function is triggered by the onClick event handler for the "Resources" and "Links" links.
This line of the function sets the layer's visibility property (through the style property), which is a CSS property that controls the visibility of a layer. When the layer is created, it is hidden, so the showLayer( ) function sets visibility to "visible" to make the menu appear.
The hideLayer( ) function works just like the showLayer( ) function, except that it hides the menu by setting visibility to "hidden". The hideLayer( ) function is triggered by the onDblClick event handler.
This <div> tag creates the layer for the "Resources" menu. Note that the layer is given a specific id, so that we can refer to it later. Various CSS properties are set using the style attribute. These properties set the size and position of the layer precisely, so that it appears at the appropriate location for a drop-down menu. The one CSS property we haven't seen yet is visibility; this property is set to hidden so that menu is invisible until the user clicks on the "Resources" link to activate it.
This link is created to control the menu. The onClick event handler calls showLayer( ) to display the menu, and the onDblClick event handler calls hideLayer( ) to remove it. Each function is passed the argument 'ResMenu', which tells the function which layer to display and hide.
It is pretty easy to adapt this script for your own site: most of the work is in figuring out the layout for your menu links and then determining the exact size and location for each menu layer. In other words, you'll need to adjust the top, left, width, and height properties for the actual content and layout of your page. You can also adjust the various color styles to suit your purposes. The two properties you need to leave as is are position and visibility. Give each menu layer a unique id attribute, and then pass that ID to the showLayer( ) and hideLayer( ) functions via the onClick and onDblClick event handlers for your menu link. You don't need to change the showLayer( ) and hideLayer( ) functions at all.
Maki ng an object move in DHTML is like making any other style change. All you are doing is changing one of two properties -- style.left or style.top -- to get an object from one place to another. The illusion of motion happens when you change the object's position incrementally and quickly.
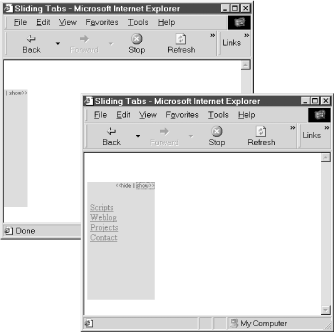
In this example, we're creating a tab on the left-hand side of the browser that is 75 pixels off the left edge of the screen, so that the main content of the tab is not visible. When the user clicks on "show>>", the tab moves right 5 pixels every millisecond until it is completely onscreen, as shown in Figure 29-3. Clicking on the "<<hide" link returns the tab to its original position.

Example 29-4 shows the DHTML code for the sliding tab. As with the drop-down menu, we are creating a positioned layer and manipulating it with the DOM. What's new in this example is the code for moving the layer. Just by changing the style.left property, we've created the illusion of motion.
<head>
<title>Sliding Tabs</title>
<style>
<!--
.hideshow { color: #333333; font-size: 9px; font-family: sans-serif;
text-decoration: none; }
-->
</style>
<script language="JavaScript">
<!--
function showLayer() {
hiddenLayer = document.getElementById("TabLayer"); (A)
layerPosition = parseInt(hiddenLayer.style.left);
if (layerPosition < 0) {
hiddenLayer.style.left = (layerPosition + 5) + "px"; (B)
setTimeout("showLayer()", 20); (C)
}
}
function hideLayer() { (D)
hiddenLayer = document.getElementById("TabLayer");
hiddenLayer.style.left = "-75" + "px";
}
//-->
</script>
</head>
<body>
<div id="Layer1" (E)
style="position:absolute; left:-75px; top:50px;
width:115px; height:200px; z-index:1;
background-color: #CCCCCC; layer-background-color: #CCCCCC;">
<p align="right" class="hideshow">
<a href="javascript:hideLayer( );" class="hideshow"><<hide</a> (F)
<a href="javascript:showLayer( );" class="hideshow">show>></a> (G)
</p>
<p align="left" style="margin-left: 5px;">
<a href="#">Scripts</a><br>
<a href="#">Weblog</a><br>
<a href="#">Projects</a><br>
<a href="#">Contact</a>
</p>
</div>
</body>
</html>This line references the layer object for our tab and stores it in the variable named layer. Since the showLayer( ) function only needs to work on one layer, we don't get the layer ID as an argument but instead refer specifically to 'TabLayer' in the call to getElementById( ).
(B)
This line is what actually moves the tab layer. Each time showLayer( ) is called, if the layer isn't in its final position, style.left is incremented by 5 (shown in bold), which moves the tab five pixels to the right. If you want to change the distance the layer travels each frame, you can replace this value. A larger value will result in faster movement, a smaller value in slower movement. Note the inclusion of "px" here; this specifies the units (pixels) and converts the whole thing to a string. Both are necessary when setting location values in JavaScript.
The setTimeout( ) method is a built-in JavaScript method that lets you create a counter that waits a given number of milliseconds before executing a function. With this method, we can call showLayer( ) repeatedly, where each call moves the layer a few pixels until it is in its final position. Each repetition of the function is equivalent to one frame of animation, so the amount of time setTimeout( ) waits before executing showLayer( ) is, in effect, your frame rate. The second argument to setTimeout( ) (shown in bold) controls how often showLayer( ) is called. We're using a value of 20, which refers to 20 milliseconds. To make the animation go more slowly, increase this value.
The hideLayer( ) function simply moves the tab layer back to its original position, so that the content of the tab is not visible.
This <div> tag creates the layer for the sliding tab. Note that left is set to -75px, which is what pushes the content of the tab out of the visible region of the browser window. Also, because the layer is in fact visible, we don't need to set the visibility property.
The "<<hide" link uses a javascript: URL to call the hideLayer( ) function.

Copyright © 2002 O'Reilly & Associates. All rights reserved.